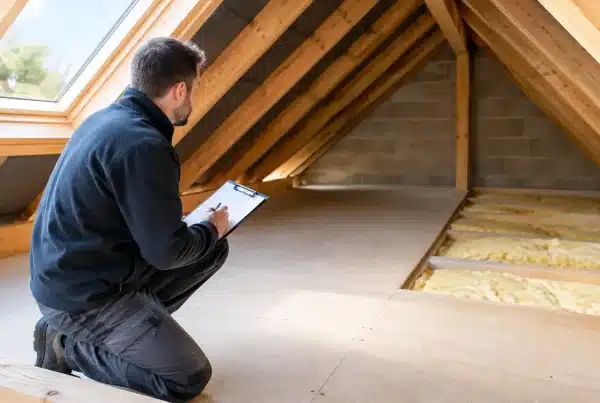
A loft in an older home can look like easy storage space until you open the hatch. Uneven joists, thin or patchy insulation, awkward access and decades of stored belongings are common. This older house loft upgrade example shows how a practical storage solution can be planned without treating the loft as though it were a modern new-build.
The aim is not to create a room or overload the roof structure. It is to make the space clean, accessible and safe for the things a household genuinely needs to store, while allowing the insulation beneath the boarding to continue doing its job.
The older house loft upgrade example
Consider a 1930s semi-detached house with a traditional pitched roof and a small ceiling hatch above the landing. The owners needed somewhere for Christmas decorations, suitcases, children’s keepsakes and household items that had gradually filled a spare bedroom. They did not want the cost, planning considerations or disruption of a full loft conversion.
The existing loft had insulation laid loosely between the ceiling joists. It was compressed in places where previous occupants had put sheets of chipboard directly on top. There was no fixed ladder, no lighting, and only a narrow central strip that could be reached safely. The roof itself appeared dry and sound, but the usable area was far smaller than it first seemed.
This is a familiar situation in properties across Cardiff, Newport and Bristol. Older homes often have useful loft volume, but it needs a considered system rather than a few boards laid across the joists.
What the survey needed to establish
Before recommending boarding, a professional survey should look beyond the floor area. The joist direction, depth and condition matter, as do any signs of water ingress, historic timber issues, ventilation requirements and electrical cables. The position of the water tank or pipework, if present, also affects the layout.
In this example, the ceiling joists were suitable for a storage-focused raised boarding installation, but they were not being treated as a floor for a habitable room. That distinction matters. A loft conversion requires structural design and compliance with a different set of building regulations. A loft storage upgrade is intended for sensible domestic storage and safe access, not heavy furniture, gym equipment or regular living use.
The survey also identified insulation gaps near the eaves and several areas where it had been squashed flat. Compressed insulation holds less air and performs less effectively. Simply boarding over it would have preserved the problem and could have made it worse.
Why raised boarding was the right approach
The solution was to install a raised loft boarding system over the chosen central storage area. Supports were fixed to create a new level above the insulation, allowing the insulation to sit at its intended depth rather than being trapped under boards. Loft boards were then fitted on top to produce a stable storage platform.
This approach brought two benefits at once. The family gained a properly defined storage area, and the insulation could be improved without sacrificing headroom unnecessarily. In an older house, that balance is especially valuable because joist depths are often shallower and layouts less uniform than in newer properties.
Not every loft needs to be boarded wall to wall. In fact, doing so can be wasteful and can make future access to services harder. Here, a carefully sized boarded zone provided ample capacity for labelled boxes and seasonal items, while leaving the roof edges and service routes clear.
The installation team also avoided blocking ventilation paths. Roof ventilation helps manage moisture within the roof space, and older properties can be less forgiving when airflow is restricted. Details such as clear eaves, tidy cable routing and accessible pipework are not glamorous, but they are part of a durable result.
Improving access changed how the loft could be used
A storage platform is only useful if getting into the loft feels safe. The original hatch was too small for larger boxes and had no secure means of access. It encouraged the owners to balance on a step ladder and pull themselves through the opening, which is not a sensible long-term arrangement.
The hatch was enlarged where the ceiling layout allowed, finished neatly, and paired with a fitted loft ladder. The new ladder gave the household stable access without needing to fetch a separate ladder from the garage. A handhold and a properly operating hatch made the process more comfortable, particularly when carrying light storage boxes.
It is worth being realistic about loft ladders. They make access safer and easier, but a loft is still a loft. Heavy or awkward items should not be carried up alone, and storage should be organised so frequently used possessions stay nearest the hatch. The safest system is one that suits how the household will actually use it.
Lighting, insulation and clearance made the difference
The old loft had a single dim bulb near the hatch, controlled by a pull cord. Once boarding was installed, that light would not adequately cover the wider storage area. New loft lighting was added so the family could see the route from the ladder to the boards and identify items without using a torch.
Lighting should be planned around practical tasks rather than appearance. A bright, well-positioned fitting near the access point and sufficient illumination across the boarded section are generally more useful than trying to light every corner of the roof void. Any electrical work should be assessed and completed appropriately for the property.
Before installation, old loose materials, damaged boxes and unwanted items were cleared from the intended work area. Loft clearance is often overlooked, yet it gives the installer a safer workspace and prevents the new area being built around clutter. It also lets the homeowner start again with a storage plan rather than moving the same disorganised pile onto new boards.
The insulation was then topped up and levelled where needed, with care taken around cables and pipework. In some older homes, pipe insulation and a review of water tanks may also be sensible, particularly where the loft is cold in winter. The right specification depends on the property, its existing insulation and how the roof is ventilated.
The finished result: storage without a conversion
At the end of the upgrade, the family had a clean raised platform, safe ladder access, a larger hatch and reliable lighting. The spare bedroom could be used properly again, while the loft held the possessions that did not need to be available every week.
Just as importantly, the work had a clear limit. The roof space had become useful storage, not an unofficial extra room. There was no attempt to add a staircase, plasterboard the rafters or install a bedroom where the structure and approvals had not been designed for one. That kept the project faster, more affordable and far less disruptive than a conversion.
For many owners of older homes, this is the sensible middle ground. A professional loft upgrade can usually be completed much more quickly than major building work, yet it can make a noticeable difference to how the whole house functions.
What can vary in an older loft upgrade
No two older properties are identical. A Victorian terrace, a post-war semi and a 1970s detached home can all have different joist sizes, roof shapes, insulation conditions and access restrictions. Some lofts have water tanks, chimney breasts, steelwork or unusually low headroom that changes the recommendation.
There are also situations where boarding should wait. Active leaks, widespread damp, suspected timber decay, unsafe electrics or structural concerns need attention first. A reputable installer should explain this plainly rather than fit boards over an unresolved problem.
Likewise, the amount you intend to store affects the design. Light household storage is one thing; repeated storage of heavy books, tiles, tools or bulky equipment may require a different discussion. Being honest at the survey stage helps ensure the system is designed for its intended use.
A simple way to prepare for your survey
Before a survey, think about the items you want to keep and how often you will need them. Take a quick look at the hatch location, though avoid stepping onto unboarded areas or disturbing insulation yourself. If you know of leaks, cold rooms below the loft, old wiring or previous alterations, mention them from the outset.
A specialist can then recommend the appropriate level of boarding, access, insulation and lighting for the property. Loft Ins Space takes this tailored approach because the best result is not the biggest possible boarded area. It is a safe, usable loft that protects the home and gives you storage you can rely on.
A well-planned loft upgrade gives an older house room to breathe again. Start with the condition of the loft, be clear about what you need to store, and choose a solution that respects the building as much as it improves daily life.