A loft that feels freezing in winter and stifling in summer is usually telling you the same thing – the insulation is missing, compressed, poorly fitted or simply not doing its job anymore. If you are wondering how to insulate a loft properly, the answer is not just to roll out more material and hope for the best. Done well, loft insulation helps retain heat, lowers energy waste and protects the usefulness of the space above your ceiling.
For many homeowners, the real challenge is balancing warmth with storage. That is where good loft insulation planning matters. If insulation is squashed under boards or packed tightly into the wrong areas, its performance drops. If ventilation is blocked, moisture problems can follow. The best result is a loft that stays energy efficient, remains accessible and works safely for the long term.
How to insulate a loft properly without creating problems
The basic principle is straightforward. Heat rises, and your loft is one of the main places where it escapes. Insulation slows that heat loss by trapping air within the material, but it only works properly when it is installed to the right depth, laid evenly and left uncompressed.
In most homes, the main layer sits between the ceiling joists, with an additional layer laid across them to reduce thermal bridging. That cross-layer matters because timber joists themselves allow more heat through than insulation does. If you only insulate between joists, you are usually leaving performance on the table.
The complication comes when the loft is also needed for storage. Standard boards fixed directly to joists can flatten the insulation underneath. That makes the loft floor easier to use in the short term, but less effective thermally. It can also create issues in newer homes where preserving ventilation and installation standards matters.
Start by checking what is already there
Before adding anything, it is worth understanding the current condition of the loft. Older insulation may be thin, patchy or damp. In some homes, different materials have been added over time with no real plan, leaving gaps around the eaves, cables, pipework or hatch.
Look at the depth first. Many older lofts still have far less insulation than current recommendations. Then check the coverage. Even a decent thickness will underperform if there are bare spots around the perimeter or cold bridges where material has been disturbed.
Condition matters as much as depth. If insulation is wet, mouldy or heavily compressed, topping it up may not solve the issue. You may need sections removed and replaced. The same applies if old boarding has trapped the material flat for years.
Choosing the right loft insulation
For a standard cold loft, mineral wool remains one of the most common and cost-effective options. It is widely used because it performs well, fits easily between joists and can be layered across the loft floor. It suits many homes where the goal is to improve thermal performance without turning the roof space into a habitable room.
Rigid insulation boards can also be used in some situations, particularly where space is tight or a specific build-up is needed. They can deliver strong thermal performance for less thickness, but they require more precise fitting. Gaps around the edges reduce their effectiveness, so installation quality is especially important.
Sheep wool and other natural insulation products appeal to some homeowners, particularly in older properties, but suitability depends on the structure, moisture conditions and budget. There is no single best product for every loft. The right choice depends on the property type, how the loft will be used and whether the work needs to fit around boarding, access improvements or electrical additions.
Depth, fit and coverage matter more than most people think
If you want to know how to insulate a loft properly, this is where many jobs go wrong. Insulation should be fitted consistently, not crammed into place. Between the joists, it should sit snugly without being overpacked. The top layer should run across the joists, covering them as evenly as possible.
Recommended depths vary depending on material and property, but the wider point is simple: not enough insulation limits savings, while badly installed insulation limits performance even if the material itself is good. Gaps around edges, corners and obstacles can create cold spots that affect the rooms below.
Pipework and water tanks also need care. Pipes should be protected appropriately, and insulation should not be laid in a way that causes freezing risks. Around downlights, cabling and extract routes, a careful approach is essential. This is one reason professional surveys are valuable – they identify where a loft needs more than a straightforward top-up.
Do not block ventilation at the eaves
A loft needs to hold heat in the home below, but it also needs airflow in the roof space itself. That balance is crucial. If insulation is pushed tightly into the eaves and blocks ventilation paths, condensation can build up over time. Timber, felt and other roof elements may then be exposed to avoidable moisture.
This is particularly important in modern homes and well-sealed properties. Better energy efficiency inside the home can increase the need for the roof space to breathe correctly. Properly fitted loft insulation should leave ventilation routes clear and use the right detailing near the roof edges.
In practice, this is where rushed DIY work often causes trouble. The loft may look fully insulated at first glance, but hidden blocked vents can lead to longer-term problems that are much more expensive than doing the job properly from the start.
Storage changes the job completely
Many homeowners do not want insulation for insulation’s sake. They want a warmer house and a loft they can still use. That is entirely reasonable, but it means the installation needs to be designed around both outcomes.
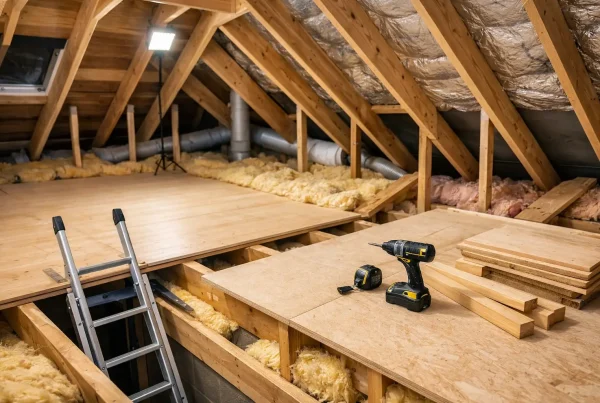
If boards are laid directly over insulation and fixed to the joists, the material underneath becomes compressed. Once compressed, it loses much of the trapped air that gives it insulating value. The loft may look tidier, but the thermal performance is reduced.
A raised loft boarding system solves that problem by lifting the deck above the insulation depth. This creates a usable storage platform without crushing the insulation layer. In homes where practical loft access matters, that approach often makes far more sense than treating boarding and insulation as separate jobs.
It can also be the safer route for homeowners in newer properties who want to avoid making alterations that could affect build standards or warranty expectations. A properly specified raised system gives you storage while respecting the insulation build-up beneath it.
New-builds and older homes need different thinking
Not every loft should be approached in the same way. New-build homes often come with stricter expectations around ventilation, loading and warranty compliance. In these properties, poorly planned boarding or insulation changes can create issues that are not obvious until later.
Older homes bring a different set of considerations. Joist sizes, roof construction, existing materials and access can vary considerably. Some have uneven insulation depths or awkward roof geometry that makes neat coverage more difficult. Others may have been altered several times over the years, leaving a mix of old and new materials in place.
That is why a one-size-fits-all quote rarely tells the full story. In areas such as Cardiff, Newport and Bristol, housing stock can vary significantly from one street to the next. A suitable solution in a modern estate may be quite different from what works in a period property with limited loft height.
When professional installation is the better choice
A simple insulation top-up can look manageable, but many lofts are not simple. Low headroom, awkward hatches, hidden wiring, uneven joists, damp signs or a need for safe storage all make the job more technical. The biggest advantage of professional installation is not just speed. It is getting the whole loft to work as a system.
That means assessing insulation depth, checking airflow, protecting access routes and making sure any boarding is compatible with the insulation below. It also means understanding when old materials should be retained, topped up or removed.
For homeowners who want a loft that is warmer, more usable and properly finished, combining insulation with raised boarding, improved access and sensible layout planning often delivers better value than doing each element separately. That is the approach specialist installers such as Loft Ins Space are built around.
What good loft insulation should feel like afterwards
You should not expect your loft to become a living room, but you should notice practical benefits. Bedrooms below the loft often feel more consistent in temperature. The home may warm up faster and hold heat longer. Storage, if included, should feel secure and easy to access rather than improvised.
Just as importantly, the loft should still be able to breathe. Insulation should look even, tidy and properly supported, not stuffed into every visible gap. If there is boarding, it should be raised where needed and installed with a clear understanding of what sits underneath.
A loft is one of the easiest parts of a house to get almost right, and that is often where problems start. The difference between an average result and a proper one is usually hidden below the boards and around the edges. If you treat insulation as part of the whole loft setup, not a standalone roll of material, you are far more likely to get a result that stays warm, safe and useful for years to come.